最近想学习一下 WordPress 自定义文章类型,发现 tutsplus 的文章介绍的挺系统,翻译过来分享下(倡萌英文不太好,只翻译个意思,还望多包涵,有能力的朋友直接去看英文吧。)
下载本教程演示的文件:https://www.wpdaxue.com/img/2013/03/Movie-Reviews.zip
WordPress 是专为定制而生的,它的每一个节都是可定制的。在这篇文章中,我们将探讨众所周知的 WordPress 最强大的功能之一:自定义文章类型(Custom Post Types),这个功能的到来,也意味着WordPress又上了一个新的高度。
到底什么是 自定义文章类型?
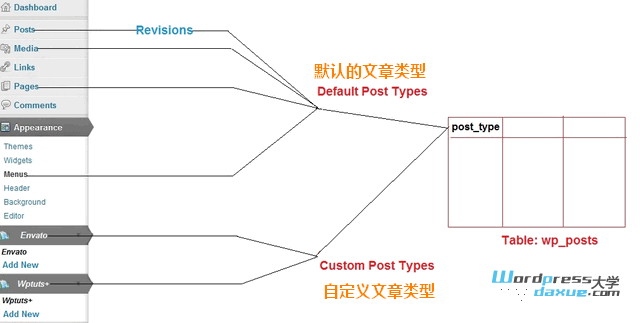
假如你想为你的博客添加一个单独的部分来发表电影评论。通过使用 自定义文章类型,你可以创建一种新的文章类型,就像文章(posts)和页面(pages)一样,它可以包含一组不同的数据。比如新的管理菜单、专门的编辑页面、自定义分类 和 更多实用的发布管理功能。
自定义文字类型 拥有新的文章管理选项,就像默认的文章类型(文章、页面、附件 )一样。一种 自定义文章类型 可以存储各种各样的信息。它有专门的编辑器、多媒体上传 并使用WordPress现有的表结构,便于数据管理。使用 WordPress 的 API 来创建自定义文章类型的主要优点在于,它可以很好地兼容现有的主题模板。同时,自定义文章类型也非常符合 SEO,因为它们拥有自己的漂亮的固定链接样式。

为什么使用自定义文章类型?
自定义文章类型帮助我们将不同类型的文章放在不同的容器中,它轻而易举地将我们的文章和其他的区别开来。
创建一个自定义文章类型插件
下面我们将创建一个自定义文章类型插件来显示最喜欢的电影评论,开始吧!
步骤1:创建 WordPress 插件目录
打开你的WordPress插件目录/wp-content/plugins,创建一个名为 Movie-Reviews 的新目录。
步骤2:创建 PHP 文件
打开 Movie-Reviews 目录,创建一个名为 Movie-Reviews.php 的PHP文件。
步骤3:添加头部
打开刚才的php文件,在顶部添加下面的代码:
<?php /* Plugin Name: Movie Reviews Plugin URI: http://wp.tutsplus.com/ Description: Declares a plugin that will create a custom post type displaying movie reviews. Version: 1.0 Author: Soumitra Chakraborty Author URI: http://wp.tutsplus.com/ License: GPLv2 */ ?> |
步骤4:注册自定义函数
在PHP结束符 ?> 的前面,添加下面的代码,来确保每次创建新页面的初始化阶段,执行自定义函数 create_movie_review 。
add_action( 'init', 'create_movie_review' ); |
步骤5:添加功能函数
添加 create_movie_review 函数的功能代码:
function create_movie_review() { register_post_type( 'movie_reviews', array( 'labels' => array( 'name' => 'Movie Reviews', 'singular_name' => 'Movie Review', 'add_new' => 'Add New', 'add_new_item' => 'Add New Movie Review', 'edit' => 'Edit', 'edit_item' => 'Edit Movie Review', 'new_item' => 'New Movie Review', 'view' => 'View', 'view_item' => 'View Movie Review', 'search_items' => 'Search Movie Reviews', 'not_found' => 'No Movie Reviews found', 'not_found_in_trash' => 'No Movie Reviews found in Trash', 'parent' => 'Parent Movie Review' ), 'public' => true, 'menu_position' => 15, 'supports' => array( 'title', 'editor', 'comments', 'thumbnail', 'custom-fields' ), 'taxonomies' => array( '' ), 'menu_icon' => plugins_url( 'images/image.png', __FILE__ ), 'has_archive' => true ) ); } |
这个 register_post_type 函数对我们最有用,一旦对它发出声明,它就为一个新的自定义文章类型准备好了各种WordPress管理功能。这个函数包括两个参数:第一个是定义了自定义文章类型的名字 name,第二个是一个数组,定义新的自定义文章类型的属性。
在这里,它的另一个的数组,包含不同的标签,用来显示这个自定义文章类型的不同部分,例如 ”name“会在仪表盘中显示这个自定义文章类型 的名字,”edit“和”view“将显示”编辑“和”查看“按钮。其他的也就非常容易理解了。
在接下来的参数:
- ‘public’ => true 决定自定义文章类型在管理后台和前端的可见性
- ‘menu_position’ => 15 决定自定义文章类型菜单的位置
- ‘supports’ => array( ‘title’, ‘editor’, ‘comments’, ‘thumbnail’, ‘custom-fields’ ) 决定显示哪些自定义文章类型的功能
- ‘taxonomies’ => array( ” ) 创建自定义分类。在这里没有定义。
- ‘menu_icon’ => plugins_url( ‘images/image.png’, __FILE__ ) 显示管理菜单的图标
- ‘has_archive’ => true 启用自定义文章类型的存档功能
请访问 register_post_type 了解更多自定义文章类型的参数细节。
步骤6:自定义文章类型的图标
制作一个 16*16 像素的图标,放在当前的插件目录,这是必需的,用来在仪表盘中作为自定义文章类型的图标。
步骤7:启用这个插件
启用插件,就看到了一个新的自定义文章类型,它有内容编辑器、发布功能、图像管理功能、评论管理和自定义字段编辑器。

步骤8:添加一个新项目
点击 Add New 菜单进入到自定义文章类型编辑器,输入电影标题、内容和设置特色图像。
步骤9:发布
发布文章,点击 View Movie Review 就可以在浏览器中查阅刚才添加的电影评论了。
为自定义文章类型创建 Meta Box
使用 Meta Box 机制可以帮助我们在 WordPress 的 Meta Box 系统中,添加 自定义文字类型 所需的各种字段,就不用再借助默认的自定义字段编辑器了。
步骤1:注册自定义函数
打开 Movie-Reviews.php 文件,添加下面的代码到最后一个 ?> 的前面。这样就注册了一个函数,可以在访问WordPress管理界面调用它。
add_action( 'admin_init', 'my_admin' ); |
步骤2:自定义功能的实现
添加一段 my_admin 函数的执行代码来注册一个 meta box ,并使它和 movie_reviews 这个自定义文章类型相关联。
function my_admin() { add_meta_box( 'movie_review_meta_box', 'Movie Review Details', 'display_movie_review_meta_box', 'movie_reviews', 'normal', 'high' ); } |
在这里,add_meta_box 是用来给自定义文章类型添加 meta boxes 的函数,它的属性说明如下:
movie_review_meta_box是所需的HTML的id属性(is the required HTMLidattribute)Movie Review Details是 meta box 标题中的可见文本内容(is the text visible in the heading of the meta box section)display_movie_review_meta_box是显示 meta box 内容的回调(is the callback which renders the contents of the meta box)movie_reviews在 meta box 中显示的自定义文章类型的名字(is the name of the custom post type where the meta box will be displayed)normal定义编辑器屏幕将显示的页面部分 (defines the part of the page where the edit screen section should be shown)high定义 boxes 在页面中显示位置的优先级(defines the priority within the context where the boxes should show)
步骤3:实现 display_movie_review_meta_box 函数的功能
<?php function display_movie_review_meta_box( $movie_review ) { // Retrieve current name of the Director and Movie Rating based on review ID $movie_director = esc_html( get_post_meta( $movie_review->ID, 'movie_director', true ) ); $movie_rating = intval( get_post_meta( $movie_review->ID, 'movie_rating', true ) ); ?> <table> <tr> <td style="width: 100%">Movie Director</td> <td><input type="text" size="80" name="movie_review_director_name" value="<?php echo $movie_director; ?>" /></td> </tr> <tr> <td style="width: 150px">Movie Rating</td> <td> <select style="width: 100px" name="movie_review_rating"> <?php // Generate all items of drop-down list for ( $rating = 5; $rating >= 1; $rating -- ) { ?> <option value="<?php echo $rating; ?>" <?php echo selected( $rating, $movie_rating ); ?>> <?php echo $rating; ?> stars <?php } ?> </select> </td> </tr> </table> <?php } ?> |
此代码用来显示 Meta box 的内容。在这里,我们使用了一个对象变量(object variable),它包含了显示在编辑器中的每一个电影评论(Movie Review)的信息。我们使用这个对象来检索到文章的 ID,然后用它来查询数据库获取对应的导演(Director)的名字(name)和等级(Rating),并且返还显示在meta box 中。当添加了一篇新文章,然后 get_post_meta 返回一个空字符串导致在 meta box 中只显示空的字段。
步骤 4: 注册一个 Save Post 函数
add_action( 'save_post', 'add_movie_review_fields', 10, 2 ); |
该函数将在保存文章时调用。
步骤 5: 实现 add_movie_review_fields 函数的功能
function add_movie_review_fields( $movie_review_id, $movie_review ) { // Check post type for movie reviews if ( $movie_review->post_type == 'movie_reviews' ) { // Store data in post meta table if present in post data if ( isset( $_POST['movie_review_director_name'] ) && $_POST['movie_review_director_name'] != '' ) { update_post_meta( $movie_review_id, 'movie_director', $_POST['movie_review_director_name'] ); } if ( isset( $_POST['movie_review_rating'] ) && $_POST['movie_review_rating'] != '' ) { update_post_meta( $movie_review_id, 'movie_rating', $_POST['movie_review_rating'] ); } } } |
当保存文章或从管理面板中删除文章时,将执行该函数。如果是 movie_reviews 这个文章类型,就进一步查看 meta box 元素是否已分配值,最后保存这些值到这些字段中。
步骤 6: 禁用默认的自定义字段选项
在创建自定义文章类型时,我们已经定义了一个函数 create_movie_review。从支持数组中移除自定义字段元素,因为它们再也用不到了。现在如果你保存了这个文件,然后打开 Movie Reviews 编辑页面,你就可以在 meta box 中看到 Movie Author 和 Movie Rating 这两个字段。当然了,你也可以添加其他字段。

创建一个该自定义文章类型专用的模板
显示自定义文章类型数据的正确方法是为每一个自定义文章类型创建专用的模板。下面,我们就来创建一个电影评论(Movie Review)专用的模板来显示它的内容。
步骤 1: 注册一个函数来强制使用专用模板
打开 Movie-Reviews.php 文件,然后添加下面的代码到php结束标签 ?> 的前面。这就注册一个函数,它会在访问 WordPress 管理界面时被调用。
add_filter( 'template_include', 'include_template_function', 1 ); |
步骤 2: 实现该函数的功能
function include_template_function( $template_path ) { if ( get_post_type() == 'movie_reviews' ) { if ( is_single() ) { // checks if the file exists in the theme first, // otherwise serve the file from the plugin if ( $theme_file = locate_template( array ( 'single-movie_reviews.php' ) ) ) { $template_path = $theme_file; } else { $template_path = plugin_dir_path( __FILE__ ) . '/single-movie_reviews.php'; } } } return $template_path; } |
上面的代码会在当前主题目录搜索一个类似 single-(post-type-name).php 模板文件,如果没有搜索到,它就会到这个插件的目录来搜索,也即是我们下来要添加的插件文件。这个 template_include 挂钩(hook)是用来更改默认行为,并执行特定的模板的。
步骤3:创建页面(Single Page)模板
保存好上面编辑的那个文件后,创建一个名为 single-movie_reviews.php 的文件,然后在里面添加下面的代码:
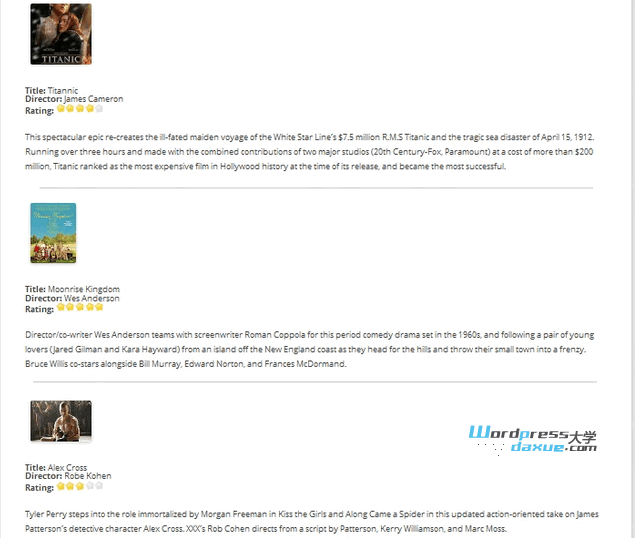
<?php /*Template Name: New Template */ get_header(); ?> <div id="primary"> <div id="content" role="main"> <?php $mypost = array( 'post_type' => 'movie_reviews', ); $loop = new WP_Query( $mypost ); ?> <?php while ( $loop->have_posts() ) : $loop->the_post();?> <article id="post-<?php the_ID(); ?>" <?php post_class(); ?>> <header class="entry-header"> <!-- Display featured image in right-aligned floating div --> <div style="float: right; margin: 10px"> <?php the_post_thumbnail( array( 100, 100 ) ); ?> </div> <!-- Display Title and Author Name --> <strong>Title: </strong><?php the_title(); ?><br /> <strong>Director: </strong> <?php echo esc_html( get_post_meta( get_the_ID(), 'movie_director', true ) ); ?> <br /> <!-- Display yellow stars based on rating --> <strong>Rating: </strong> <?php $nb_stars = intval( get_post_meta( get_the_ID(), 'movie_rating', true ) ); for ( $star_counter = 1; $star_counter <= 5; $star_counter++ ) { if ( $star_counter <= $nb_stars ) { echo '<img src="' . plugins_url( 'Movie-Reviews/images/icon.png' ) . '" />'; } else { echo '<img src="' . plugins_url( 'Movie-Reviews/images/grey.png' ). '" />'; } } ?> </header> <!-- Display movie review contents --> <div class="entry-content"><?php the_content(); ?></div> </article> <?php endwhile; ?> </div> </div> <?php wp_reset_query(); ?> <?php get_footer(); ?> |
现在,我们已经通过循环(loop)创建了一个基本的页面模板。这个 函数检索自定义文章类型的元素,并在循环中使用它们。当然,这仅仅是一个基本的循环,你可以根据自己想需要调整。你也可以使用适当的CSS样式来格式化那些元素。
注意:你需要在后台创建一个新的页面,并且选择刚才创建的页面模板。
步骤4:添加图片
你需要添加2个 32*32 像素的星星图标到你的插件文件夹中。分别命名为 icon.png 和 grey.png 。好了,现在电影评论就会显示在一个页面上,并且按照日期排序。

在我的下一个教程《WordPress 自定义文章类型 介绍及实例解说(下)》,我的自定义文章类型应包括更多的功能,如创建一个存档页面,创建自定义分类,自定义列等,请提供您的宝贵建议。
原文:http://wp.tutsplus.com/tutorials/plugins/a-guide-to-wordpress-custom-post-types-creation-display-and-meta-boxes/
编译:胡倡萌@WordPress大学 – wpdaxue.com (标题有改动)
后话:倡萌的英语实在太烂了,翻译这篇文章居然用了2个小时,有些地方还翻译不准确,望大家见谅。同时欢迎英文好的朋友指正,不胜感激!
来源:
https://www.wpdaxue.com/wordpress-custom-post-types.html


