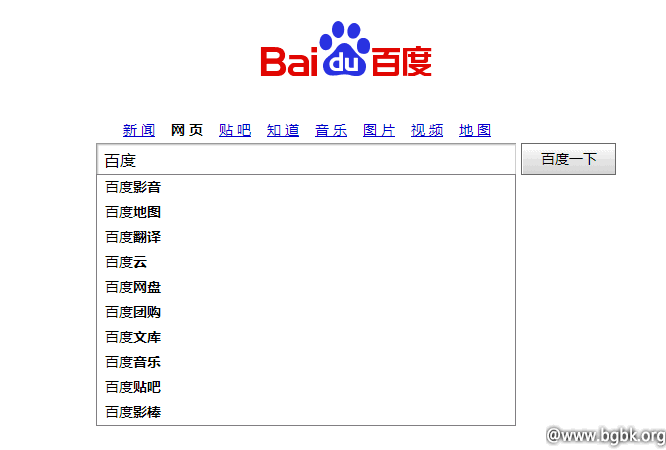
我想了半天,也没给这篇文章一个准确的标题,来张图说明大家肯定就明白了:

百度搜索,只要你打上关键词,就会自动弹出下拉框提示有关内容,这么炫的功能我们一定要给自己的博客加上!
方法有两种,两种方法效果略有不同,稍后会详细解释。
方法一、插件
@万戈 制作了一个插件,可以实现上述功能,非常简单,什么都不用做,直接下载安装即可(该插件未被提交到官方,无法在线安装):官方下载 | 备用下载
其实这个插件有一个缺点:只能匹配标签,不能直接匹配文章内容,这让插件感觉很不实用。

方法二、代码
代码比插件法更实用,可以匹配出文章,但对没有什么技术的新手,实现却是一个挑战(该代码来自 @大发)。
1、首先打开主题的 search.php,找到:
get_header(); |
替换成:
if(isset($_SERVER['HTTP_X_REQUESTED_WITH']) && strtolower($_SERVER['HTTP_X_REQUESTED_WITH']) == 'xmlhttprequest'){ $array_posts = array (); if (have_posts()) : while (have_posts()) : the_post(); array_push($array_posts, array("title"=>get_the_title(),"url"=>get_permalink())); endwhile; endif; echo json_encode($array_posts); } else { get_header(); |
再找到:
get_footer(); |
替换为:
get_footer();} |
然后对搜索框代码进行改造,给搜索结果做定位。按照下边的例子修改搜索框:
<div id="search-container" class="ajax_search"> <form method="get" id="searchform" action="<?php echo esc_url(home_url('/')); ?>"> <div class="filter_container"><input type="text" value="" autocomplete="off" placeholder="输入内容并回车" name="s" id="search-input"/><ul id="search_filtered" class="search_filtered"></ul> </div> <input type="submit" name="submit" id="searchsubmit" class="searchsubmit" value=""/> </form> </div> |
接着在 footer.php 中的:
<?php wp_footer(); ?> |
前加入下边的代码:
<script>var home_url="<?php echo esc_url(home_url('/')); ?>";</script> |
最后在 JS 文件中贴上下边的代码:
//search var input_search = $("#search-input"); function makeAjaxSearch(result) { if (result.length == 0) { $("#search_filtered").empty().show().append('<li><a href="javascript:vold(0)"><strong>这能搜到嘛?</strong></a></li>'); } else { $("#search_filtered").empty().show(); for (var i = 0; i < result.length; i++) $("#search_filtered").append('<li><a href="' + result[i]["url"] + '">' + result[i]["title"] + '</a></li>'); } } var delaySearch; function startSearch() { $.ajax({ type: "GET", url: home_url, data: "s=" + input_search.val(), dataType: 'json', success: function (result) { makeAjaxSearch(result); console.log(result); } }); } var event_ajax_search = { bind_event: function () { input_search.bind('keyup', function (e) { if (input_search.val() != "" && e.keyCode != 40) { if (delaySearch) { clearTimeout(delaySearch) } delaySearch = setTimeout(startSearch, 200); } if (e.keyCode == 40) { search_filtered.moveable(); } }) }, unbind_event: function () { input_search.unbind('keyup'); } }; var search_filtered = { moveable: function () { var current = 0; $('#search_filtered').find('a').eq(current).focus(); $(document).bind("keydown.search_result", function (e) { if (e.keyCode == 40) { if (current >= $('#search_filtered').find('a').size()) { current = 0; } $('#search_filtered').find('a').eq(++current).focus(); e.preventDefault(); } if (e.keyCode == 38) { if (current < 0) { current = $('#search_filtered').find('a').size() - 1; } $('#search_filtered').find('a').eq(--current).focus(); e.preventDefault(); } }); }, hide: function () { $(document).unbind("keyup.search_result"); $('#search_filtered').fadeOut(); } }; input_search.focus(function () { event_ajax_search.bind_event(); }).blur(function () { event_ajax_search.unbind_event(); }); |
参考 CSS:
.filter_container {display: inline-block;position: relative;} .ajax_search .search_filtered a {display: block;font-size: 12px;overflow: hidden;padding: 7px 12px 7px 10px;text-overflow: ellipsis;white-space: nowrap;width: 153px;color: #D14836;} .ajax_search .search_filtered {background-color: rgba(255, 255, 255, 0.95);left: 0;position: absolute;text-align: left;top: 102%;z-index: 200;} #search-input{float: left;border:none;height:22px;width:150px;padding-right:25px;line-height: 22px;text-indent: 10px;font-size:12px;background-color: transparent;background-image:url(img/search.png);background-repeat:no-repeat;background-position:right center} #search-input:focus{background-color: #fff;} #searchsubmit{display: none;} .ajax_search .search_filtered a:hover, .ajax_search .search_filtered a:focus {background-color: rgba(0, 0, 0, 0.03);text-decoration: none;outline:thin dotted} |
总结
第二种方法效果比第一种好,但显然麻烦爆了,如果你比较懒,而又喜欢好的效果,很遗憾,我也没办法。
唉,自己衡量利弊吧!
来源:
https://www.wpdaxue.com/keyword-search-dropdown-tips.html


