Kivy是Python中与平台无关的GUI工具。由于它可以在Android, IOS, Linux和Windows等操作系统上运行。它基本上是用于开发Android应用程序, 但这并不意味着它不能在桌面应用程序上使用。
??Kivy教程–通过示例学习Kivy。
AnchorLayout:
的AnchorLayout将其子项与边框(上, 下, 左, 右)或中心对齐。下面给出的类用于实现锚点布局。
kivy.uix.anchorlayout.AnchorLayout可以使用以下参数初始化AnchorLayout:
anchor_x
Parameters can be passed: "left", "right" and "center".

anchor_y
Parameters can be passed:"top", "bottom" and "center".
选择将小部件放置在父容器中的位置。
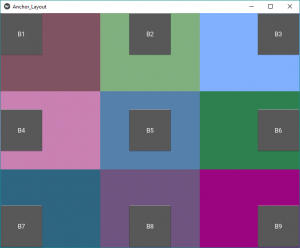
可以放置Anchorlayout来实现效果的9个不同的布局区域:左上, 顶部居中, 顶部右, 居中左, 居中居中, 居中右, 居左下, 居中居中和居右下。
Basic Approach:

1) import kivy
2) import kivyApp
3) import gridlayout(not necessary according to requirement)
4) import Anchorlayout
5) Set minimum version(optional)
6) create Layout class
7) create App class
8) Set up .kv file
9) Return the instance of layout class
10) Run an instance of the Appclass
在以下示例代码中, 我们使用了
网格布局
作为我们的根小部件类。的
网格布局
, 将是9个AnchorLayouts的父级。 9个AnchorLayouts将锚定在9个不同的锚定位置, 即我们将在9个帮助下在一个程序中使用所有9个Anchorlayout位置
纽扣
.
该方法的实施:
main.py文件–
# Sample Python application demonstrating the
# working of AnchorLayout in Kivy using .kv file

###################################################

# base Class of your App inherits from the App class.
# app:always refers to the instance of your application
from kivy.app import App

# GridLayout arranges children in a matrix.
# It takes the available space and
# divides it into columns and rows, # then adds widgets to the resulting "cells".
from kivy.uix.gridlayout import GridLayout

# to change the kivy default settings
# we use this module config
from kivy.config import Config

# 0 being off 1 being on as in true /false
# you can use 0 or 1 && True or False
Config. set ( 'graphics' , 'resizable' , True )


# creating the root widget used in .kv file
class Anchor_Layout(GridLayout):
     pass

# class in which name .kv file must be named Anchor_Layout.kv
class Anchor_LayoutApp(App):
     def build( self ):
         # returning the instance of root class
         return Anchor_Layout()

# run the app
if __name__ = = '__main__' :
     Anchor_LayoutApp().run()
.kv文件–
# Implementation of .kv file of Anchor layout

################################################


# creating the features of Button
<MyButton@Button>:
     size_hint: [ None , None ]
     size: [ 100 , 100 ]

# creating the root of .kv
<Anchor_Layout>:

     # Assigning grids
     rows: 3

     # Anchor Layout 1
     AnchorLayout:

         # position of Anchor Layout
         anchor_x: 'left'
         anchor_y: 'top'

         # creating Canvas
         canvas:
             Color:
                 rgb: [. 5 , . 324 , . 384 ]
             Rectangle:
                 pos: self .pos
                 size: self .size

         # creating Button
         MyButton:
             text: 'B1'

     # Anchor Layout 2
     AnchorLayout:
         anchor_x: 'center'
         anchor_y: 'top'
         canvas:
             Color:
                 rgb: [. 5 , . 692 , . 498 ]
             Rectangle:
                 pos: self .pos
                 size: self .size
         MyButton:
             text: 'B2'

     # Anchor Layout 3
     AnchorLayout:
         anchor_x: 'right'
         anchor_y: 'top'
         canvas:
             Color:
                 rgb: [. 5 , . 692 , 1 ]
             Rectangle:
                 pos: self .pos
                 size: self .size
         MyButton:
             text: 'B3'

     # Anchor Layout 4
     AnchorLayout:
         anchor_x: 'left'
         anchor_y: 'center'
         canvas:
             Color:
                 rgb: [. 789 , . 5 , . 699 ]
             Rectangle:
                 pos: self .pos
                 size: self .size
         MyButton:
             text: 'B4'

     # Anchor Layout 5
     AnchorLayout:
         anchor_x: 'center'
         anchor_y: 'center'
         canvas:
             Color:
                 rgb: [. 333 , . 5 , . 673 ]
             Rectangle:
                 pos: self .pos
                 size: self .size
         MyButton:
             text: 'B5'

     # Anchor Layout 6
     AnchorLayout:
         anchor_x: 'right'
         anchor_y: 'center'
         canvas:
             Color:
                 rgb: [. 180 , . 5 , . 310 ]
             Rectangle:
                 pos: self .pos
                 size: self .size
         MyButton:
             text: 'B6'

     # Anchor Layout 7
     AnchorLayout:
         anchor_x: 'left'
         anchor_y: 'bottom'
         canvas:
             Color:
                 rgb: [. 180 , . 398 , . 5 ]
             Rectangle:
                 pos: self .pos
                 size: self .size
         MyButton:
             text: 'B7'

     # Anchor Layout 8
     AnchorLayout:
         anchor_x: 'center'
         anchor_y: 'bottom'
         canvas:
             Color:
                 rgb: [. 438 , . 329 , . 5 ]
             Rectangle:
                 pos: self .pos
                 size: self .size
         MyButton:
             text: 'B8'

     # Anchor Layout 9
     AnchorLayout:
         anchor_x: 'right'
         anchor_y: 'bottom'
         canvas:
             Color:
                 rgb: [. 611 , . 021 , . 5 ]
             Rectangle:
                 pos: self .pos
                 size: self .size
         MyButton:
             text: 'B9'
输出如下:

首先, 你的面试准备可通过以下方式增强你的数据结构概念:Python DS课程。
来源:
https://www.srcmini02.com/70596.html


