Tkinter是一个Python标准库, 用于创建GUI(图形用户界面)应用程序。它是最常用的Python软件包之一。 Tkinter在以下帮助下支持传统和现代图形支持Tk主题小部件。 tkinter还提供了所有小部件tkinter.ttk.
在中添加样式tkinter.ttk按钮有点令人毛骨悚然, 因为它不支持直接实施。在样式中添加样式ttk按钮我们必须首先创建一个样式类的对象tkinter.ttk.
我们可以使用以下步骤创建ttk.Button:
btn = ttk.Button(master, option = value, ...)ttk.Button选项–
命令:按下按钮时要调用的功能。文字:出现在按钮上的文字。图片:要在按钮上显示的图片。 style:用于渲染此按钮的样式。
在上添加样式ttk按钮我们无法直接在选项中传递值。首先, 我们必须创建一个Style对象, 该对象可以如下创建:
style = ttk.Style()下面的代码将仅向选定的按钮添加样式, 即, 只有那些按钮将被更改, 我们将在其中传递样式选项。
代码1:
from tkinter import *
from tkinter.ttk import *

root = Tk()
root.geometry( '100x100' )

# This will create style object
style = Style()

# This will be adding style, and
# naming that style variable as
# W.Tbutton (TButton is used for ttk.Button).

style.configure( 'W.TButton' , font =
                ( 'calibri' , 10 , 'bold' , 'underline' ), foreground = 'red' )

# Style will be reflected only on
# this button because we are providing
# style only on this Button.
''' Button 1'''
btn1 = Button(root, text = 'Quit !' , style = 'W.TButton' , command = root.destroy)
btn1.grid(row = 0 , column = 3 , padx = 100 )

''' Button 2'''
btn2 = Button(root, text = 'Click me !' , command = None )
btn2.grid(row = 1 , column = 3 , pady = 10 , padx = 100 )

root.mainloop()
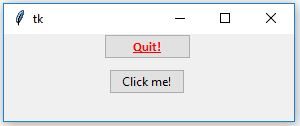
输出如下:

仅会设置一个按钮的样式, 因为在上面的代码中, 我们仅在一个按钮中提供样式。
代码#2在所有可用按钮上应用样式
from tkinter import *
from tkinter.ttk import *

root = Tk()
root.geometry( '100x100' )

style = Style()


# Will add style to every available button
# even though we are not passing style
# to every button widget.
style.configure( 'TButton' , font =
                ( 'calibri' , 10 , 'bold' , 'underline' ), foreground = 'red' )
# button 1
btn1 = Button(root, text = 'Quit !' , style = 'TButton' , command = root.destroy)

btn1.grid(row = 0 , column = 3 , padx = 100 )

# button 2
btn2 = Button(root, text = 'Click me !' , command = None )
btn2.grid(row = 1 , column = 3 , pady = 10 , padx = 100 )

root.mainloop()
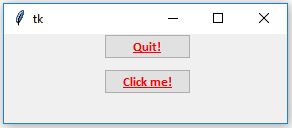
输出如下:

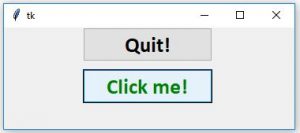
现在, 如果你想通过鼠标的移动来更改按钮的外观, 即当我们将鼠标悬停在按钮上时, 它将更改其颜色;当我们按下按钮时, 它将更改颜色, 依此类推。
代码#3
鼠标悬停时更改颜色
from tkinter import *
from tkinter.ttk import *

root = Tk()
root.geometry( '500x500' )

style = Style()
style.configure( 'TButton' , font =
                ( 'calibri' , 20 , 'bold' ), borderwidth = '4' )

# Changes will be reflected
# by the movement of mouse.
style. map ( 'TButton' , foreground = [( 'active' , '! disabled' , 'green' )], background = [( 'active' , 'black' )])

# button 1
btn1 = Button(root, text = 'Quit !' , command = root.destroy)
btn1.grid(row = 0 , column = 3 , padx = 100 )

# button 2
btn2 = Button(root, text = 'Click me !' , command = None )
btn2.grid(row = 1 , column = 3 , pady = 10 , padx = 100 )

root.mainloop()
输出如下:

首先, 你的面试准备可通过以下方式增强你的数据结构概念:Python DS课程。
来源:
https://www.srcmini02.com/70589.html


