本文概述
你可能认为创建聊天是一项艰巨的任务, 但是比你想象的要容易(因为我们在此网站上发布的所有博客)。
传统上, 套接字是围绕其构建大多数实时聊天系统的解决方案, 它在客户端和服务器之间提供了双向通信通道。这意味着服务器可以将消息推送到客户端。每当你写聊天消息时, 其想法都是服务器将得到它并将其推送到所有其他连接的客户端。
注意:如标题中所述, 此实现是不可知的, 我们仅涵盖客户端的后端和基本功能。由你决定如何使用CSS或其他东西自定义它。
要求
- Ratchet Socketome软件包:Ratchet是一个松散耦合的PHP库, 为开发人员提供了工具, 可通过WebSockets在客户端和服务器之间创建实时双向应用程序。
要在你的symfony项目中包含socketome, 请使用composer并执行以下命令
composer require cboden/ratchet或者, 你可以修改composer.json文件, 然后使用composer安装。
{
    "require": {
        "cboden/ratchet": "0.3.*"
    }
}- 支持套接字的浏览器。
你已经准备好出发了!
创建聊天
为了开始简单的聊天, 我们将创建一个所有人都可以使用的开放空间(只要WebSocket定位到指定的URL)。
遵循的步骤
- 在包中的Sockets文件夹中创建Chat.php类。
- 在”命令”文件夹中创建一个symfony命令, 以通过命令控制台启动聊天。
- 在视图中使用Javascript处理套接字。
- 开始并测试你的聊天。
创建一个套接字
首先, 在捆绑软件的根文件夹中创建一个名为”套接字”的文件夹, 并在其上创建以下类(Chat.php)。
此类将处理所有连接, 消息等。稍后将在通过控制台进行初始化时使用它(请记住, 请根据你的软件包更改名称空间)。
<?php
// myapp\src\yourBundle\Sockets\Chat.php;

// Change the namespace according to your bundle, and that's all !
namespace sandboxBundle\Sockets;

use Ratchet\MessageComponentInterface;
use Ratchet\ConnectionInterface;

class Chat implements MessageComponentInterface {
    protected $clients;

    public function __construct() {
        $this->clients = new \SplObjectStorage;
    }

    public function onOpen(ConnectionInterface $conn) {
        // Store the new connection to send messages to later
        $this->clients->attach($conn);

        echo "New connection! ({$conn->resourceId})\n";
    }

    public function onMessage(ConnectionInterface $from, $msg) {
        $numRecv = count($this->clients) - 1;
        echo sprintf('Connection %d sending message "%s" to %d other connection%s' . "\n"
            , $from->resourceId, $msg, $numRecv, $numRecv == 1 ? '' : 's');

        foreach ($this->clients as $client) {
            if ($from !== $client) {
                // The sender is not the receiver, send to each client connected
                $client->send($msg);
            }
        }
    }

    public function onClose(ConnectionInterface $conn) {
        // The connection is closed, remove it, as we can no longer send it messages
        $this->clients->detach($conn);

        echo "Connection {$conn->resourceId} has disconnected\n";
    }

    public function onError(ConnectionInterface $conn, \Exception $e) {
        echo "An error has occurred: {$e->getMessage()}\n";

        $conn->close();
    }
}
现在我们在服务器端有了套接字处理程序, 我们需要创建代码来启动它。
创建命令以开始聊天
通常, 你应该保存代码以在php文件中启动它, 然后通过php file.php使用控制台。但是, 作为Symfony中的一个好习惯, 我们将在symfony命令中执行该代码, 这将使事情变得更轻松, 并且如果你想在控制器中执行命令或其他想要执行的疯狂事情, 你将能够执行。做。
要继续, 请在包的根文件夹中创建一个名为” Command”的文件夹(如果尚不存在), 并在其上创建以下命令(SocketCommand.php)(你可以在此处阅读如何创建自定义symfony控制台命令)如果你想知道以下步骤的工作原理)。
不要忘记根据你的捆绑包更改名称空间。
<?php
// myapplication/src/sandboxBundle/Command/SocketCommand.php
// Change the namespace according to your bundle
namespace sandboxBundle\Command;

use Symfony\Component\Console\Command\Command;
use Symfony\Component\Console\Input\InputInterface;
use Symfony\Component\Console\Output\OutputInterface;

// Include ratchet libs
use Ratchet\Server\IoServer;
use Ratchet\Http\HttpServer;
use Ratchet\WebSocket\WsServer;

// Change the namespace according to your bundle
use sandboxBundle\Sockets\Chat;

class SocketCommand extends Command
{
    protected function configure()
    {
        $this->setName('sockets:start-chat')
            // the short description shown while running "php bin/console list"
            ->setHelp("Starts the chat socket demo")
            // the full command description shown when running the command with
            ->setDescription('Starts the chat socket demo')
        ;
    }

    protected function execute(InputInterface $input, OutputInterface $output)
    {
        $output->writeln([
            'Chat socket', // A line
            '============', // Another line
            'Starting chat, open your browser.', // Empty line
        ]);

        $server = IoServer::factory(
            new HttpServer(
                new WsServer(
                    new Chat()
                )
            ), 8080
        );

        $server->run();
    }
}
现在服务器端的所有内容都已准备就绪, 我们可以在命令行中使用php bin / console sockets:start-chat开始聊天, 但是我们需要在客户端处理套接字。
使用Javascript处理客户端套接字
要处理客户端, 只需在视图中添加以下代码即可。如你所见, 这非常简单, 它打开了Javascript WebSocket, 附加了最基本的事件, 并且从服务器发送JSON字符串到服务器, 并从服务器接收JSON字符串, 并在客户端进行处理。随时做得更好!
注意:取决于你要在其中放置客户端代码的位置。以下代码段可以在你的任何控制器的任何嫩枝视图或纯HTML响应中使用。切记更改套接字的URL(在本例中为ws:// sandbox:8080, 具体取决于你的测试域或本地主机)。
<h1>Public chat</h1>
<ul id="chat-list"></ul>
<hr>
<textarea id="form-message" placeholder="Your public message here"></textarea>
<input type="button" id="form-submit" value="Send message"/>

<script>
    // This object will be sent everytime you submit a message in the sendMessage function.
    var clientInformation = {
        username: new Date().getTime().toString()
        // You can add more information in a static object
    };

    // START SOCKET CONFIG
    /**
     * Note that you need to change the "sandbox" for the URL of your project.
     * According to the configuration in Sockets/Chat.php , change the port if you need to.
     * @type WebSocket
     */
    var conn = new WebSocket('ws://sandbox:8080');

    conn.onopen = function(e) {
        console.info("Connection established succesfully");
    };

    conn.onmessage = function(e) {
        var data = JSON.parse(e.data);
        Chat.appendMessage(data.username, data.message);

        console.log(data);
    };

    conn.onerror = function(e){
        alert("Error: something went wrong with the socket.");
        console.error(e);
    };
    // END SOCKET CONFIG


    /// Some code to add the messages to the list element and the message submit.
    document.getElementById("form-submit").addEventListener("click", function(){
        var msg = document.getElementById("form-message").value;

        if(!msg){
            alert("Please send something on the chat");
        }

        Chat.sendMessage(msg);
        // Empty text area
        document.getElementById("form-message").value = "";
    }, false);

    // Mini API to send a message with the socket and append a message in a UL element.
    var Chat = {
        appendMessage: function(username, message){
            var from;

            if(username == clientInformation.username){
                from = "me";
            }else{
                from = clientInformation.username;
            }

            // Append List Item
            var ul = document.getElementById("chat-list");
            var li = document.createElement("li");
            li.appendChild(document.createTextNode(from + " : "+ message));
            ul.appendChild(li);
        }, sendMessage: function(text){
            clientInformation.message = text;
            // Send info as JSON
            conn.send(JSON.stringify(clientInformation));
            // Add my own message to the list
            this.appendMessage(clientInformation.username, clientInformation.message);
        }
    };
</script>
你的一般聊天基本上已经准备就绪。
开始聊天并进行测试
要开始聊天, 请在控制台中使用先前创建的命令:
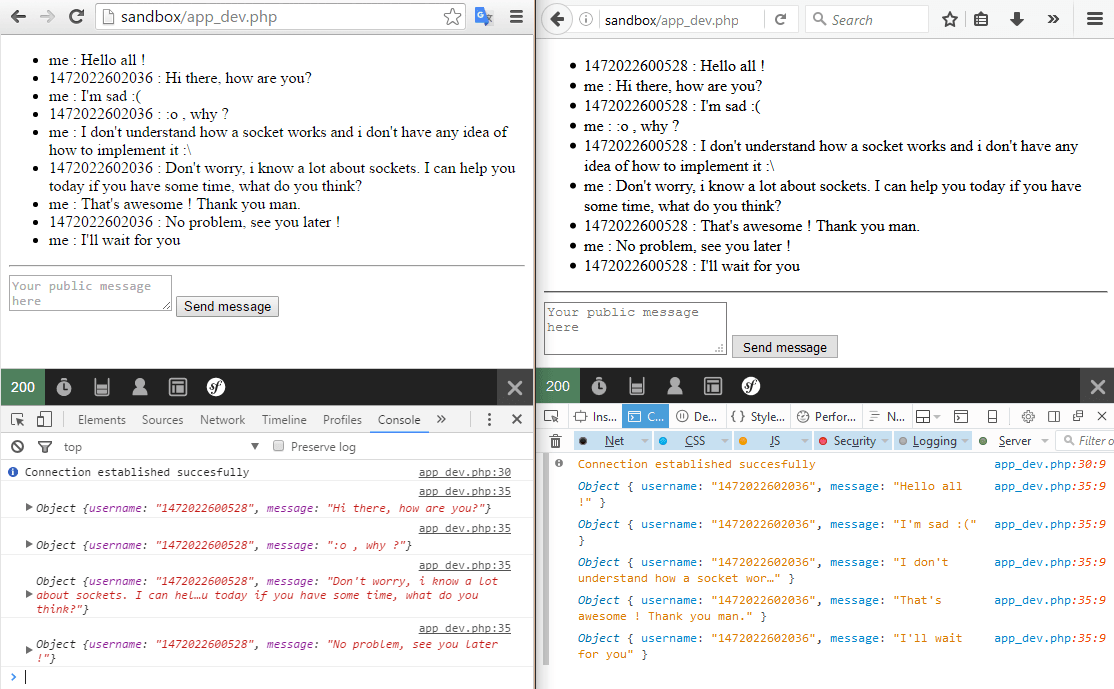
php bin/console sockets:start-chat现在, 如果你只是复制粘贴了客户端代码(标记和javascript), 要对其进行测试以启动Google Chrome和Mozilla Firefox(不一定是那些, 而是2种不同的浏览器), 请导航至项目中的视图并查看魔术。

你将能够在开始聊天的控制台中查看连接:

恭喜你!你已经进行了简单的聊天, 可以自己进行自定义。
多次聊天
前面的聊天示例针对的是8080端口中域的根路径, 但是, 如果你的聊天不只针对一个聊天室, 则可以使用不同的处理程序创建不同的套接字路由。
在这种情况下, 我们将使用相同的Chat.php类, 但请注意, 初始化是不同的, 你的symfony命令需要更改。
在这种情况下, 而不是将ws:// sandbox:8080用作套接字路由, 现在我们将其更改为ws:// sandbox:8080 / chat。现在, 我们开始聊天的命令将是:
<?php
// myapplication/src/sandboxBundle/Command/SocketCommand.php
// Change the namespace according to your bundle
namespace sandboxBundle\Command;

use Symfony\Component\Console\Command\Command;
use Symfony\Component\Console\Input\InputInterface;
use Symfony\Component\Console\Output\OutputInterface;

// Ratchet libs
use Ratchet\App;
// Chat instance
use sandboxBundle\Sockets\Chat;

class SocketCommand extends Command
{
    protected function configure()
    {
        $this->setName('sockets:start-chat')
            // the short description shown while running "php bin/console list"
            ->setHelp("Starts the chat socket demo")
            // the full command description shown when running the command with
            ->setDescription('Starts the chat socket demo')
        ;
    }

    protected function execute(InputInterface $input, OutputInterface $output)
    {
        $output->writeln([
            'Chat socket', // A line
            '============', // Another line
            'Starting chat, open your browser.', // Empty line
        ]);

        // The domain of your app as first parameter

        // Note : if you got problems during the initialization, add as third parameter '0.0.0.0'
        // to prevent any error related to localhost :
        // $app = new \Ratchet\App('sandbox', 8080, '0.0.0.0');
        // Domain as first parameter
        $app = new App('sandbox', 8080, '0.0.0.0');
        // Add route to chat with the handler as second parameter
        $app->route('/chat', new Chat);

        // To add another routes, then you can use :
        //$app->route('/america-chat', new AmericaChat);
        //$app->route('/europe-chat', new EuropeChat);
        //$app->route('/africa-chat', new AfricaChat);
        //$app->route('/asian-chat', new AsianChat);

        // Run !
        $app->run();
    }
}
如你所见, 只要你有更多的套接字处理程序类, 就可以轻松地向套接字端口添加更多路由。现在在客户端, websocket应该现在是:
var conn = new WebSocket('ws://sandbox:8080/chat');基本故障排除
在本地工作, 但不能在远程或服务器中工作第一个示例有效, 但多条路线无效
这是一项安全功能!默认情况下, 棘轮绑定到127.0.0.1, 该绑定仅允许自身进行连接。推荐的方法是将Ratchet放在代理后面, 并且仅该代理(本地)将连接。
如果要打开Ratchet(不在代理后面), 则将App的第三个参数设置为” 0.0.0.0″(如示例中所述)。
Ratchet Socketome的基本故障排除还包含其他问题, 稍后可能会发现。
玩得开心 !
来源:
https://www.srcmini02.com/59423.html


