本文概述
当然, 有很多Java库可以让你扫描QR码, 但是并不是所有的Java库都与Android兼容, 或者至少它们不是那么容易实现。 QReader是那些库之一, 它使你可以轻松地在Android应用程序中实现QRCode扫描器, 而无需担心。
在本文中, 我们将向你展示如何安装和使用QReader库来读取Android应用程序中的QR代码。
1.添加并安装QReader作为gradle的依赖项
第一步, 要开始使用QReader库, 你需要安装它。通过gradle管理可以轻松完成此操作。如果你使用的是Gradle> 4.0, 则通过以下方式添加依赖项:
dependencies {
    implementation 'com.github.nisrulz:qreader:2.1.1'
}
如果你使用的是Gradle <4.0, 则按如下所示添加它:
dependencies {
    compile 'com.github.nisrulz:qreader:2.1.1'
}
到本文日期为止, 最新的可用版本可能更高, 因此请确保在存储库的发行页面上检查可用的最新版本。添加依赖项后, 请同步项目, 以便将库安装。有关此库的更多信息, 请访问Github上的官方存储库。
2.注册助手权限类
在你的项目中创建一个新的Java类, 即RuntimePermissionUtil.java。该文件将包含以下代码:
// \app\src\main\java\com\yourcompany\yourapp\RuntimePermissionUtil.java
package com.yourcompany.yourapp;

/*
 * Copyright (C) 2016 Nishant Srivastava
 *
 * Licensed under the Apache License, Version 2.0 (the "License");
 * you may not use this file except in compliance with the License.
 * You may obtain a copy of the License at
 *
 *    http://www.apache.org/licenses/LICENSE-2.0
 *
 * Unless required by applicable law or agreed to in writing, software
 * distributed under the License is distributed on an "AS IS" BASIS, * WITHOUT WARRANTIES OR CONDITIONS OF ANY KIND, either express or implied.
 * See the License for the specific language governing permissions and
 * limitations under the License.
 */

import android.app.Activity;
import android.content.Context;
import android.content.pm.PackageManager;
import android.support.v4.app.ActivityCompat;

public class RuntimePermissionUtil {

    private RuntimePermissionUtil() {

    }

    public static void onRequestPermissionsResult(int[] grantResults, RPResultListener rpResultListener) {
        if (grantResults.length > 0) {
            for (int grantResult : grantResults) {
                if (grantResult == PackageManager.PERMISSION_GRANTED) {
                    rpResultListener.onPermissionGranted();
                } else {
                    rpResultListener.onPermissionDenied();
                }
            }
        }
    }

    public static void requestPermission(final Activity activity, final String[] permissions, final int REQUEST_CODE) {
        // No explanation needed, we can request the permission.
        ActivityCompat.requestPermissions(activity, permissions, REQUEST_CODE);
    }

    public static void requestPermission(final Activity activity, final String permission, final int REQUEST_CODE) {
        // No explanation needed, we can request the permission.
        ActivityCompat.requestPermissions(activity, new String[] { permission }, REQUEST_CODE);
    }

    public static boolean checkPermissonGranted(Context context, String permission) {
        return (
            ActivityCompat.checkSelfPermission(context, permission)
            ==
            PackageManager.PERMISSION_GRANTED
        );
    }
}
稍后将在我们的实现代码中使用此类, 以动态地处理相机权限, 就像新的Android平台一样。你还将需要创建一个包含以下内容的接口文件:
// \app\src\main\java\com\yourcompany\yourapp\RPResultListener.java
package com.yourcompany.yourapp;

interface RPResultListener {
    void onPermissionGranted();

    void onPermissionDenied();
}
完成此步骤后, 你将拥有2个额外的Java文件, 我们将在下一步的实现中使用它们。
3.创建布局
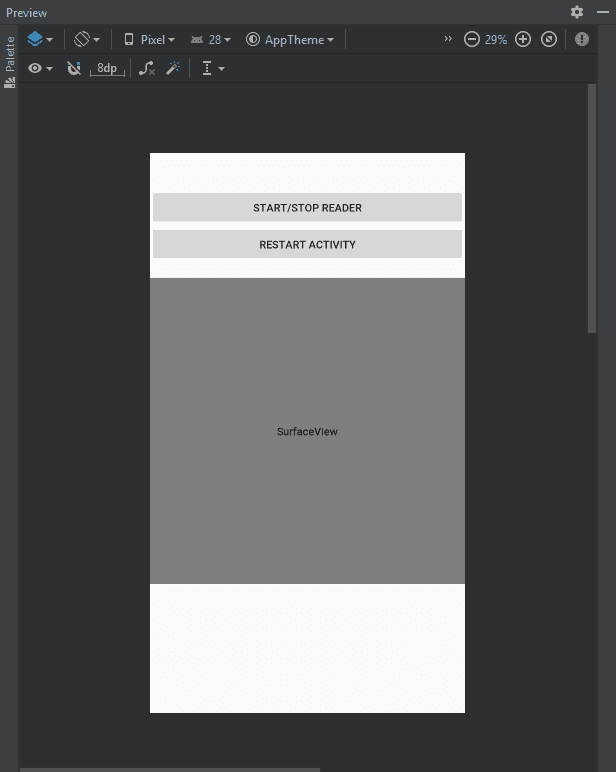
布局需要根据你的需求非常独立, 但是, 我们将使用一种非常基本的方法, 其中将包含2个按钮, 一个用于处理阅读器状态(启用/禁用)的按钮, 以及用于重新启动当前活动的按钮。我们将对上述元素使用线性布局, 并将其放置在主活动中。由于我们的应用仅包含此内容, 因此你可以为活动创建另一种布局, 以防你想在另一种布局中创建它:
<?xml version="1.0" encoding="utf-8"?>
<android.support.constraint.ConstraintLayout xmlns:android="http://schemas.android.com/apk/res/android"
    xmlns:app="http://schemas.android.com/apk/res-auto"
    xmlns:tools="http://schemas.android.com/tools"
    android:id="@+id/container"
    android:layout_width="match_parent"
    android:layout_height="match_parent"
    tools:context=".MainActivity">

    <LinearLayout
        android:id="@+id/info"
        android:layout_width="match_parent"
        android:layout_height="wrap_content"
        android:layout_alignParentBottom="true"
        android:orientation="vertical"
        >
        <TextView
            android:id="@+id/code_info"
            android:layout_width="match_parent"
            android:layout_height="wrap_content"
            android:gravity="center"
            android:padding="10dp"
            android:textColor="@android:color/black"
            android:textSize="20sp"
        />
        <Button
            android:id="@+id/btn_start_stop"
            android:layout_width="match_parent"
            android:layout_height="wrap_content"
            android:text="Start/Stop reader"
        />

        <Button
            android:id="@+id/btn_restart_activity"
            android:layout_width="match_parent"
            android:layout_height="wrap_content"
            android:layout_gravity="center_horizontal"
            android:text="Restart activity"
        />

        <SurfaceView
            android:id="@+id/camera_view"
            android:layout_width="match_parent"
            android:layout_height="400dp"
            android:layout_marginTop="20dp"
            android:layout_above="@+id/info"
        />
    </LinearLayout>

</android.support.constraint.ConstraintLayout>
此布局将具有以下预览:

4.活动实施
最后, 我们需要编写代码来处理你的活动中的逻辑。如前所述, 我们正在一个只有一个活动的空项目中工作, 因此我们将在应用程序的主活动上处理代码, 但是你可以根据需要在另一个活动上实现代码。首先, 我们需要包括将要使用的类的名称空间。还创建类级别的变量, 这些变量将包含例如读取器实例, 将在其中显示相机图像的表面视图。
该逻辑仅基于首先请求摄影机许可(如果已获得许可), 则应使用初始化QReader基本实例的setupQREader方法启动阅读器。当读者检测到并解释QRCode时, 其内容将显示在我们布局的信息标签中:
// \app\src\main\java\com\yourcompany\yourapp\MainActivity.java
package com.yourcompany.yourapp;

import android.Manifest;
import android.content.Intent;
import android.os.Bundle;
import android.support.annotation.NonNull;
import android.support.v7.app.AppCompatActivity;
import android.util.Log;
import android.widget.TextView;
import android.widget.Button;
import android.view.View;
import android.view.SurfaceView;
import github.nisrulz.qreader.QRDataListener;
import github.nisrulz.qreader.QREader;

public class MainActivity extends AppCompatActivity {

    // User Interface
    private TextView text;

    // QREader
    private SurfaceView mySurfaceView;
    private QREader qrEader;
    private boolean hasCameraPermission = false;
    private static final String cameraPerm = Manifest.permission.CAMERA;

    @Override
    protected void onCreate(final Bundle savedInstanceState) {
        super.onCreate(savedInstanceState);
        setContentView(R.layout.activity_main);

        // 1. When the app starts, request Camera permission
        hasCameraPermission = RuntimePermissionUtil.checkPermissonGranted(this, cameraPerm);

        text = findViewById(R.id.code_info);


        // 2. Handle action button text. With this button you will start/stop the reader
        final Button stateBtn = findViewById(R.id.btn_start_stop);
        // change of reader state in dynamic
        stateBtn.setOnClickListener(new View.OnClickListener() {
            @Override
            public void onClick(View v) {
                if (qrEader.isCameraRunning()) {
                    stateBtn.setText("Start QREader");
                    qrEader.stop();
                } else {
                    stateBtn.setText("Stop QREader");
                    qrEader.start();
                }
            }
        });

        stateBtn.setVisibility(View.VISIBLE);

        Button restartButton = findViewById(R.id.btn_restart_activity);
        restartButton.setOnClickListener(new View.OnClickListener() {
            @Override
            public void onClick(View view) {
                restartActivity();
            }
        });

        // Setup SurfaceView
        // -----------------
        mySurfaceView = findViewById(R.id.camera_view);

        if (hasCameraPermission) {
            // Setup QREader
            setupQREader();
        } else {
            RuntimePermissionUtil.requestPermission(
                MainActivity.this, cameraPerm, 100
            );
        }
    }

    void restartActivity() {
        startActivity(new Intent(MainActivity.this, MainActivity.class));
        finish();
    }

    void setupQREader() {
        // Init QREader
        // ------------
        qrEader = new QREader.Builder(this, mySurfaceView, new QRDataListener() {
            @Override
            public void onDetected(final String data) {
                Log.d("QREader", "Value : " + data);
                text.post(new Runnable() {
                    @Override
                    public void run() {
                        text.setText(data);
                    }
                });
            }
        }).facing(QREader.BACK_CAM)
            .enableAutofocus(true)
            .height(mySurfaceView.getHeight())
            .width(mySurfaceView.getWidth())
            .build();
    }

    @Override
    protected void onPause() {
        super.onPause();

        if (hasCameraPermission) {

            // Cleanup in onPause()
            // --------------------
            qrEader.releaseAndCleanup();
        }
    }

    @Override
    protected void onResume() {
        super.onResume();

        if (hasCameraPermission) {

            // Init and Start with SurfaceView
            // -------------------------------
            qrEader.initAndStart(mySurfaceView);
        }
    }

    // Method that handles the result of the permission request made at the beginning of the application
    @Override
    public void onRequestPermissionsResult(
        int requestCode, @NonNull final String[] permissions, @NonNull final int[] grantResults
    ) {
        if (requestCode == 100) {
            RuntimePermissionUtil.onRequestPermissionsResult(grantResults, new RPResultListener() {
                @Override
                public void onPermissionGranted() {
                    if ( RuntimePermissionUtil.checkPermissonGranted(MainActivity.this, cameraPerm)) {
                        restartActivity();
                    }
                }

                @Override
                public void onPermissionDenied() {
                    // Do nothing
                }
            });
        }
    }
}
编码愉快!


