本文概述
Android提供了将Google地图集成到我们的应用程序中的功能。 Google地图显示你的当前位置,导航位置方向,搜索位置等。我们还可以根据需要自定义Google地图。
Google Maps的类型
有四种不同类型的Google地图,以及根本没有地图的可选地图。他们每个人在地图上都给出不同的看法。这些地图如下:
- 正常:这种类型的地图显示典型的路线图,自然特征(如河流)和某些人为构建的特征。
- 混合型:这种类型的地图显示具有典型路线图的卫星照片数据。它还显示道路和要素标签。
- 卫星:卫星类型显示卫星照片数据,但不显示道路和要素标签。
- 地形:此类型显示摄影数据。这包括颜色,轮廓线和标签以及透视阴影。
- 无:此类型显示一个空网格,未加载图块。
不同类型地图的语法
googleMap.setMapType(GoogleMap.MAP_TYPE_NORMAL);
googleMap.setMapType(GoogleMap.MAP_TYPE_HYBRID);
googleMap.setMapType(GoogleMap.MAP_TYPE_SATELLITE);
googleMap.setMapType(GoogleMap.MAP_TYPE_TERRAIN);
谷歌地图的方法
Google Map API提供了几种有助于自定义Google Map的方法。这些方法如下:
| 方法 | 描述 |
|---|---|
| addCircle(CircleOptions options) | 此方法将圆添加到地图。 |
| addPolygon(PolygonOptions options) | 此方法将多边形添加到地图。 |
| addTileOverlay(TileOverlayOptions options) | 此方法将图块叠加层添加到地图。 |
| animateCamera(CameraUpdate update) | 此方法根据动画更新地图。 |
| clear() | 此方法将从地图上删除所有内容。 |
| getMyLocation() | 此方法返回当前显示的用户位置。 |
| moveCamera(CameraUpdate update) | 此方法根据更新中定义的说明重新定位相机。 |
| setTrafficEnabled(boolean enabled) | 此方法将流量层设置为打开或关闭。 |
| snapshot(GoogleMap.SnapshotReadyCallback callback) | 此方法拍摄地图快照。 |
| stopAnimation() | 如果有任何进展, 此方法将停止照相机动画。 |
Google Map示例
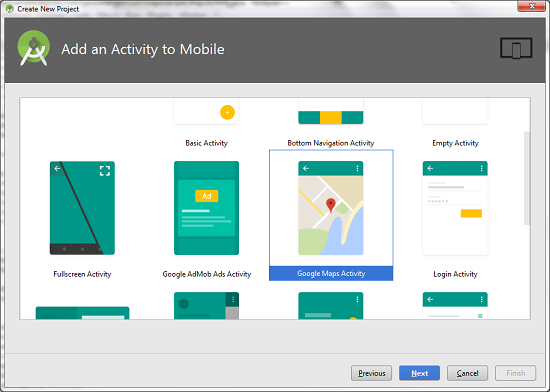
让我们创建一个在我们的应用程序中集成Google地图的示例。为此,我们选择Google Maps Activity。
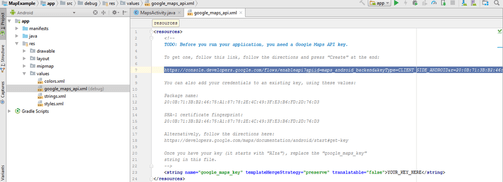
复制google_map_api.xml文件中的网址以生成Google地图密钥。
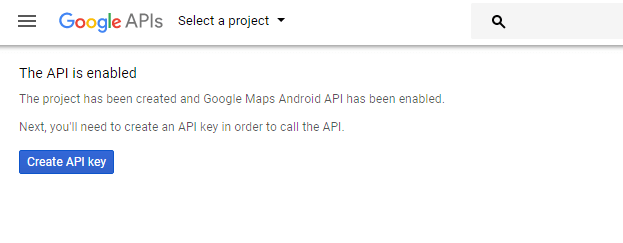
将复制的URL粘贴到浏览器中。它将打开以下页面。
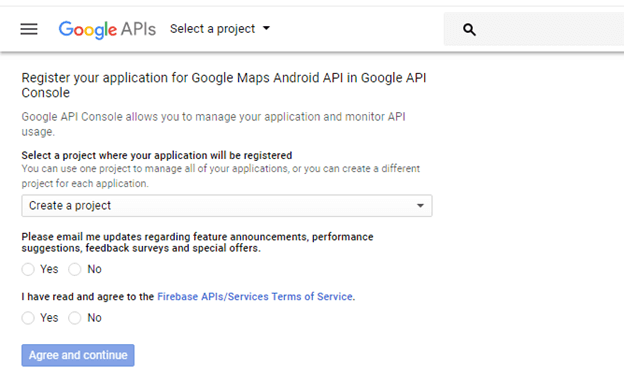
单击创建API密钥以生成API密钥。
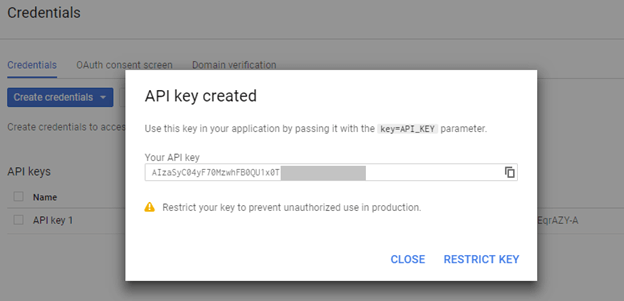
单击创建API密钥后,它将生成显示以下屏幕的我们的API密钥。
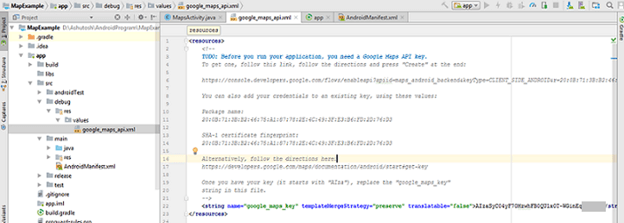
将此生成的API密钥复制到我们的google_map_api.xml文件中
activity_maps.xml
<fragment xmlns:android="http://schemas.android.com/apk/res/android"
    xmlns:map="http://schemas.android.com/apk/res-auto"
    xmlns:tools="http://schemas.android.com/tools"
    android:id="@+id/map"
    android:name="com.google.android.gms.maps.SupportMapFragment"
    android:layout_width="match_parent"
    android:layout_height="match_parent"
    tools:context="example.com.mapexample.MapsActivity" />
MapsActivity.java
要在MapsActivity.java类中获取GoogleMap对象,我们需要实现OnMapReadyCallback接口并覆盖onMapReady()回调方法。
package example.com.mapexample;

import android.support.v4.app.FragmentActivity;
import android.os.Bundle;
import com.google.android.gms.maps.CameraUpdateFactory;
import com.google.android.gms.maps.GoogleMap;
import com.google.android.gms.maps.OnMapReadyCallback;
import com.google.android.gms.maps.SupportMapFragment;
import com.google.android.gms.maps.model.LatLng;
import com.google.android.gms.maps.model.MarkerOptions;

public class MapsActivity extends FragmentActivity implements OnMapReadyCallback{

    private GoogleMap mMap;

    @Override
    protected void onCreate(Bundle savedInstanceState) {
        super.onCreate(savedInstanceState);
        setContentView(R.layout.activity_maps);
        // Obtain the SupportMapFragment and get notified when the map is ready to be used.
        SupportMapFragment mapFragment = (SupportMapFragment) getSupportFragmentManager()
                .findFragmentById(R.id.map);
        mapFragment.getMapAsync(this);

    }

    @Override
    public void onMapReady(GoogleMap googleMap) {
        mMap = googleMap;

        // Add a marker in Sydney and move the camera
        LatLng sydney = new LatLng(-34, 151);
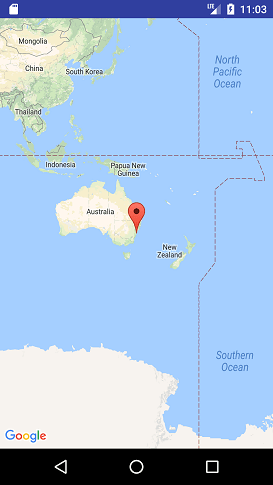
        mMap.addMarker(new MarkerOptions().position(sydney).title("Marker in Sydney"));
        mMap.moveCamera(CameraUpdateFactory.newLatLng(sydney));

    }
}
所需权限
在AndroidManifest.xml文件中添加以下用户权限。
<uses-permission android:name="android.permission.ACCESS_FINE_LOCATION" />
<uses-permission android:name="android.permission.ACCESS_COARSE_LOCATION" />
<uses-permission android:name="android.permission.INTERNET" />
AndroidManifest.xml
<?xml version="1.0" encoding="utf-8"?>
<manifest xmlns:android="http://schemas.android.com/apk/res/android"
    package="example.com.mapexample">
    <!--
         The ACCESS_COARSE/FINE_LOCATION permissions are not required to use
         Google Maps Android API v2, but you must specify either coarse or fine
         location permissions for the 'MyLocation' functionality.
    -->
    <uses-permission android:name="android.permission.ACCESS_FINE_LOCATION" />
    <uses-permission android:name="android.permission.ACCESS_COARSE_LOCATION" />
    <uses-permission android:name="android.permission.INTERNET" />

    <application
        android:allowBackup="true"
        android:icon="@mipmap/ic_launcher"
        android:label="@string/app_name"
        android:roundIcon="@mipmap/ic_launcher_round"
        android:supportsRtl="true"
        android:theme="@style/AppTheme">

        <meta-data
            android:name="com.google.android.geo.API_KEY"
            android:value="@string/google_maps_key" />

        <activity
            android:name=".MapsActivity"
            android:label="@string/title_activity_maps">
            <intent-filter>
                <action android:name="android.intent.action.MAIN" />

                <category android:name="android.intent.category.LAUNCHER" />
            </intent-filter>
        </activity>
    </application>

</manifest>
build.gradel
在build.gradel文件中添加以下依赖项。
dependencies {
    implementation fileTree(dir: 'libs', include: ['*.jar'])
    implementation 'com.android.support:appcompat-v7:26.1.0'
    implementation 'com.google.android.gms:play-services-maps:11.8.0'
    testImplementation 'junit:junit:4.12'
    androidTestImplementation 'com.android.support.test:runner:1.0.1'
    androidTestImplementation 'com.android.support.test.espresso:espresso-core:3.0.1'
}
输出量
